I got my ham radio license eight years ago so I could use it for a high altitude balloon project with some friends from college. We had a lot of fun, but I haven’t used the license much since then. I get into it for a few weeks every couple of years and then get bored. I just don’t have much interest in talking to strangers over the air. I’ve always been much more fascinated by the idea of packet radio. Sending data over the airwaves without any centralized infrastructure just sounded cool and also reminded me of the things I’ve read about the pre-Internet days. Back then the primary way to connect with other computers was via BBS. I was a bit too young and missed out on those days, but still find the concept interesting.
I thought packet radio could be a way to experience that sort of technology in the modern world. The main problem is that there isn’t a whole lot of good information about this stuff online. It seems kind of scattered, plus most of the programs you can find to do this stuff seem to have been written twenty years ago, so they often are buggy or don’t work at all. This is especially true if you try to stick with Windows software. After a lot of trial and error, I managed to turn my Raspberry Pi into a functioning packet radio node. Then I figured out how to run Zork on it! I thought I’d document the process here for others who may want to try the same thing. Here’s a video to demonstrate how it works!
{{< youtube 16OUQ-19gXI >}}
Prerequisites
In order to setup your own packet node with a RasPi, you are going to need a couple of things:
- Raspberry Pi with SD card
- Amateur radio transceiver and antenna
- KISS TNC with Serial cable
- USB to Serial adapter
- List of packet nodes in your area
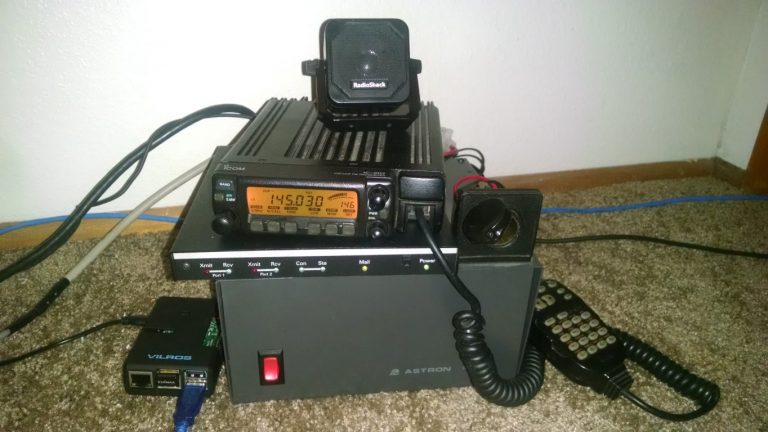
My Setup
- Raspberry Pi 2
- ICOM IC-207 Mobile Radio
- Magmount antenna on a cookie sheet
- Kantronics 9612+ TNC in KISS mode
Make sure your radio can tune to the frequencies of the packet nodes in your area. If it can’t, you won’t be communicating with anyone! Once that’s setup, you’ll need to make sure your TNC is in KISS mode and properly connected to your radio. This is entirely dependant on your specific hardware setup, so you’ll have to figure that part out on your own. If you don’t have a TNC, checkout the TNC-Pi project for a cheap KISS TNC specifically designed to work with the RasPi. The TNC will usually use a serial cable to connect to the computer. I believe the Pi has a built-in serial port, but you would need to build an adapter to use it. I just use a USB to serial adapter to get the TNC talking with the Pi.
Setup the Base OS
The first step is to setup the base operating system. I chose Raspbian since it’s pretty much the standard Pi OS. I downloaded the minimal image from the Raspbian website. At the time of this writing, it was Raspbian Jessie Lite. Once the image was downloaded, I flashed it onto a micro SD card. Then I plugged in the Pi’s Ethernet cable, plugged in the SD card, and booted up the device.
I ran an nmap scan of my network to find the Pi.
sudo nmap -sP 192.168.1.1-254
One device showed up with a RasPi MAC address.
Nmap scan report for raspberrypi (192.168.1.111)
Host is up (0.0013s latency).
MAC Address: B8:27:EB:B6:A6:A3 (Raspberry Pi Foundation)
Then I connected to the IP via SSH and logged in with the default credentials. Next, I changed the default password.
passwd
Changing password for pi.
(current) UNIX password:
Enter new UNIX password:
Retype new UNIX password:
passwd: password updated successfully
Then I updated the system.
$ sudo apt-get update
$ sudo apt-get upgrade
I installed all available updates. The next step was to setup WiFi so I could get rid of the Ethernet cable. If you don’t have a WiFi card, you can skip this part. First I made sure the WiFi card was being recognized automatically.
iwconfig
wlan0 unassociated Nickname:"<WIFI@REALTEK>"
 Mode:Managed Frequency=2.412 GHz Access Point: Not-Associated
 Sensitivity:0/0
 Retry:off RTS thr:off Fragment thr:off
 Power Management:off
 Link Quality:0 Signal level:0 Noise level:0
 Rx invalid nwid:0 Rx invalid crypt:0 Rx invalid frag:0
 Tx excessive retries:0 Invalid misc:0 Missed beacon:0
In my case it was being registered as wlan0. Now we need to edit the wpa_supplicant config and restart the network interface.
$ sudo nano /etc/wpa_supplicant/wpa_supplicant.conf
I went to the bottom of the file and added the following lines. Be sure to change the SSID and PSK to match your own network.
network={
 ssid="MYSSID"
 psk="MYWIFIPASSWORD"
}
Then I restarted the WiFi interface and checked to ensure it had an IP address.
$ sudo ifdown wlan0
$ sudo ifup wlan0
$ ifconfig wlan0
The output from ifconfig:
wlan0 Link encap:Ethernet HWaddr 74:da:38:5a:6e:e0
 inet addr:192.168.1.138 Bcast:192.168.1.255 Mask:255.255.255.0
 inet6 addr: fe80::26f5:8a4f:824c:b75e/64 Scope:Link
 UP BROADCAST RUNNING MULTICAST MTU:1500 Metric:1
 RX packets:24 errors:0 dropped:6 overruns:0 frame:0
 TX packets:37 errors:0 dropped:0 overruns:0 carrier:0
 collisions:0 txqueuelen:1000
 RX bytes:2933 (2.8 KiB) TX bytes:8033 (7.8 KiB)
Perfect! Now I can get rid of the Ethernet able and then reconnect on the new IP address. Now the base system is configured and ready!
Install and Configure AX.25
All of the packet radio stuff works on top of the AX.25 protocol. So let’s install some AX.25 tools and programs.
$ sudo apt-get install ax25-tools ax25-node ax25-apps telnet
Now we have to configure an AX25 port. This port acts as a network interface for your packet radio.
$ sudo nano /etc/ax25/axports
This file should contain two example lines, both commented out with a “#” character in front. Add a new line that looks like this:
0 CALLSIGN-N 9600 255 2 145.030 MHz (1200bps)
Let’s break down each of these things:
- 0 – Name of the port. It can be a number or a text name. I just choose zero for simplicity.
- CALLSIGN-N – This is your callsign with a number specified afterwards. I’m not too sure on the importance of the number. I just choose -9 for mine.
- 9600 – This is the speed of the port. I believe it is the speed between the computer and the TNC, not the speed of the radio connection. In my case it’s 9600 baud.
- 255 – Paclen. I’m not sure what this does, I just set mine to 255 and it works.
- 2 – Window. Again, I’m not sure about this one. I set it to 2 and it works just fine.
- 145.030 MHz (1200bps) – This is a text description. You can put anything you want here to help remind you what this port is.
Now let’s setup a netrom port. Netrom is another packet protocol that runs on top of AX.25. It has a build in routing mechanism that makes it easier to connect to other packet nodes. If you want to setup your own node, then you want to setup netrom. If you only want to connect to other nodes, you don’t have to configure the netrom stuff but it will make it a lot easier to connect to remote nodes.
$ sudo nano /etc/ax25/nrports
Then add a line like this:
netrom CALLSIGN-N #ALIAS 255 145.030 MHz (1200bps)
Let’s break it down again.
- netrom – The port name. It can be anything. I choose netrom for simplicity.
- CALLSIGN-N – Same as before. Just make it the same callsign and number.
- #ALIAS – this is an alias for your netrom packet node. This is like an alternate name people can use to connect to your node. In my area, this is usually based on location. For example, a node on top of Mount Walker would be called #WALKER.
- 255 – Paclen. Again I’m not sure what this is but I leave it at 255 and it works.
- 145.030 MHz (1200bps) – A description of the netrom port. Can be anything you want.
Now we’ll edit the daemon config file.
$ sudo nano /etc/ax25/ax25d.conf
You can delete everything in the file and replace it with the below text. Just be sure to edit it to match the ports you configured.
[CALLSIGN-N VIA 0]
NOCALL * * * * * * L
default * * * * * * - root /usr/sbin/ax25-node ax25-node

<netrom>
NOCALL * * * * * * L
default * * * * * * - root /usr/sbin/ax25-node ax25-node
First, be sure to update the section headings. So [CALLSIGN-N VIA 0] should be updated to your callsign with the -9 or whatever number you chose in the axports file. “VIA 0” should be updated to include the AX.25 port name you configured earlier in the axports file. In my case the port name is the number zero. “
Now we can bring up the AX.25 interface.
$ sudo kissattach /dev/ttyUSB0 0
You will need to replace “/dev/ttyUSB0” with the correct serial port for your KISS TNC. The final number zero is the name of the AX.25 port you configured in the axports file. You can use ifconfig to verify that the ax.25 port is now online.
ifconfig ax0
ax0 Link encap:AMPR AX.25 HWaddr CALLSIGN-N
 UP BROADCAST RUNNING MTU:255 Metric:1
 RX packets:0 errors:0 dropped:0 overruns:0 frame:0
 TX packets:0 errors:0 dropped:0 overruns:0 carrier:0
 collisions:0 txqueuelen:10
 RX bytes:0 (0.0 B) TX bytes:0 (0.0 B)
At this point, you should be able to test your settings. The first thing you can do is setup a listener on the AX.25 port. Open a new SSH console session and run the following command:
$ sudo axlisten -c -a
The screen will go blank and it will look like nothing is happening. Really, this program is listening to the AX.25 port and it will display all packets your modem sees, regardless of if they are meant for your station or not. If you leave this running for a while, you should eventually see some packet data as long as you are tuned to an active frequency and your settings are all correct.
Another test you can do is to actually connect to a local packet station! If you leave the axlisten command running in its own session, you’ll be able to see your outbound packets as well as any responses. It’s great for debugging. My area has a few Winlink 2000 BBS’s, so I just chose one to connect to as a test.The closest one to me is W7EUG-10 on 145.030 MHz. I manually tuned my radio to this frequency. Then I initiated the connection:
$ axcall 0 W7EUG-10
The zero is the axport you configured earlier. If you are able to communicate with the BBS, you should see something like this in the axlisten output.
0: fm KE7ABC-9 to W7EUG-10 ctl SABM+
0: fm W7EUG-10 to KE7ABC-9 ctl UA-
0: fm W7EUG-10 to KE7ABC-9 ctl I00^ pid=F0(Text) len 40
0000 Lane County ARES/RACES OADN RMS GatewayM
0: fm KE7ABC-9 to W7EUG-10 ctl RR1v
KE7ABC-9 is my (fake) callsign. W7EUG-10 is the BBS. Back in the axcall console, I can see output from the BBS and I can now issue commands. A good one to start with is HELP. This BBS outputs pages of data with the HELP command. To disconnect, just type “BYE” and hit enter.
Configure the Packet Node
Now that the AX.25 stuff is working, we can setup the packet node. We want our node to startup automatically at boot. We want it to listen for incoming connections and present users with the proper prompt, permissions and commands.
First we’ll edit the node.conf file. This file controls the main settings for your node.
$ sudo nano /etc/ax25/node.conf
Most of the file can be left as the default. The important things to change are the HostName and NodeId, Also make sure the Nrport is configured to the netrom port name you specified earlier. In my case, the port name is “netrom”. Here are what those lines look like for me:
HostName        KE7ABC-9
NodeId          MYNODE:KE7ABC-9
NrPort          netrom
Next we’ll edit the permissions for the node. You can configure it so your user needs to enter a password. This is handy if you provide your own user with special permissions that you don’t want other users to have access to.
$ sudo nano /etc/ax25/node.perms
You can read all about the permissions and settings by reading the node.perms man page. Here’s what I have in my node.perms file.
# user type port passwd perms
ke7abc * * PASS 255

# Default permissions per connection type.
#
* ax25 * * 7
* netrom * * 7
* local * * 7
* ampr * * 7
* inet * * 7
* host * * 7
This configuration should give my own callsign all permissions (255) but requires that I enter the password “PASS”. The default permissions for all connection types is 7, which should allow outgoing AX.25 and netrom connections but no telnet.
Now we can configure netrom broadcasting. This will tell your node how to handle processing broadcasts from other nodes and also allows you to configure some settings for your own broadcasts.
$ sudo nano /etc/ax25/nrbroadcast
Once again, the man page has a lot of good information. My setup looks like this:
# ax25_name min_obs def_qual worst_qual verbose
0 5 192 100 0
Now we can create the netrom port.
$ sudo nrattach netrom
Now to make it easy to connect to the local packet node from the shell, we can set it up as a TCP/IP service. First we’ll define the service and port.
$ sudo nano /etc/services
Add the following line all the way at the bottom. You can change port 4444 to any unused port.
ax25-node 4444/tcp # KE7ABC packet node
Then we’ll configure the service to start automatically at boot time.
$ sudo nano /etc/inetd.conf
Add the following line all the way at the bottom.
ax25-node stream tcp nowait root /usr/sbin/ax25-node ax25-node
Then restart the inetd service.
$ sudo service inetd restart
Now you can telnet into your local packet node from the command line! You can also telnet to it from another system as long as your Pi is on the same network and you have port 4444 opened up to remote connections.
telnet localhost 4444
Trying ::1...
Trying 127.0.0.1...
Connected to localhost.
Escape character is '^]'.

LinuxNode v0.3.2 (KE7ABC-9)

login:
Sweet! It’s working! Now you can log in using the callsign (and possibly password) you specified in the node.perms file. Once logged in, you should get a prompt like this.
#MYNODE:KE7ABC-9 Welcome to KE7ABC-9 network node

Type ? for a list of commands. help <commandname> gives a description
of the named command.

--
You can type ? to get a list of all commands. A good test to run is to see if you can connect to another local packet node. Tune your radio to the node’s frequency and then issue a call from your node using AX.25. To do this from within your own node, enter the following command.
C 0 WALKER
C stands for CONNECT. You can also type CONNECT if you want. The zero is the ax.25 port configured in the axports file. Finally, WALKER is the alias of my local packet node. You will have to change this to your own local packet node’s alias or callsign. If all goes well, you should be greeted with the node’s prompt!
#MYNODE:KE7ABC-9 Trying WALKER on port 0... Type <RETURN> to abort
#MYNODE:KE7ABC-9 Connected to WALKER on port 0 (Escape: CTRL-T)

You can type BYE to disconnect.

#MYNODE:KE7ABC-9 Trying WALKER on port 0... Type <RETURN> to abort
#MYNODE:KE7ABC-9 Connected to WALKER on port 0 (Escape: CTRL-T)
bye
#MYNODE:KE7ABC-9 Reconnected to KE7ABC-9

bye
#MYNODE:KE7ABC-9 Goodbye
Connection closed by foreign host.
Now we node the node is communicating with the radio properly. We still have a few things left to do in order to finish configuring it. Mainly, we want the node to listen for netrom broadcasts from other nodes so it can populate its own netrom table. This makes it much easier to connect to foreign nodes, even if they are multiple hops away from your own! We also need to make sure we have a server listening for incomming connections from other systems. It only takes two commands.
$ sudo netromd
$ sudo ax25d
That’s it! The first command will start the netromd service. It will listen for broadcasts from other nodes and then update your local node’s routing table as needed. It will also periodically send out broadcasts of its own. The second command starts the ax25d service, which will actually listen for incoming AX.25 connections and then send the users to the node software according to your configuration files. So now you have a fully functional node, but there are still a few more tweaks you should do to make your life easier. You don’t want to have to manually startup all of the node software whenever you reboot the Pi, so in the next section we’ll setup some automation to make it happen automatically at boot.
Start the Node at Boot
There are multiple ways to do this, some more desirable than others. I’m going to go with the quick and dirty route. Basically, I’m just going to throw all the commands in /etc/rc.local so they will be run at the end of the boot process.
$ sudo nano /etc/rc.local
Add the following to the end of the file, before the “exit 0” line. You want to make sure there is no “exit” command before this stuff or the script will exit before your new commands run!
/sbin/modprobe ax25                  # Load ax.25 kernel module
/sbin/modprobe netrom                # Load netrom kernel module
/usr/sbin/kissattach /dev/ttyUSB0 0  # Create the AX.25 interface
/usr/sbin/nrattach netrom            # Create the netrom interface
/usr/sbin/netromd                    # Start the netrom service
/usr/sbin/ax25d                      # Start ax.25 service and start listening
Then you can reboot the Pi and hope everything starts properly.
$ sudo reboot
Backup the Node List
Most nodes will broadcast their list every 30 or 60 minutes. When your node sees this broadcast it updates its own table, making it easier for your users to connect to other nodes. When you reboot your node, your list will be emptied, making your node more difficult to use. You’ll have to wait to receive more broadcasts. Something you can do to make things a bit nicer is to backup your node list regularly, then restore the list at boot time. You can do that pretty simply.
First, create the restore script and give it the proper permissions.
$ sudo touch /etc/ax25/nodebackup.sh
$ sudo chmod u+x /etc/ax25/nodebackup.sh
Then create a cronjob to regularly backup the nodes to this file.
$ sudo crontab -e
I set mine up to run every hour by adding this line.
0 * * * * /usr/sbin/nodesave /etc/ax25/nodebackup.sh
The nodesave command creates an executable script that will re-add all the previously known nodes. So all you have to do is make the output file executable and run it at boot time. We can run it at boot by adding this line to the end of /etc/rc.local.
/etc/ax25/nodebackup.sh
To make sure it works, first wait for your node list to populate. This may take an hour or so depending on how other nodes are configured in your area. Once you have nodes in the list, check to see if the nodebackup.sh file was updated by crontab.
$ cat /etc/ax25/nodebackup.sh
You can see that mine backed up properly. Then you just need to reboot. When the Pi is back online, log back into your packet node and list all of the known nodes. If it’s empty, then something went wrong. Otherwise, it’s all good!
What Now?
Now you have your awesome packet node setup. What can you do with it? In my area, the nodes seem to exist solely for emergency communications. The BBS functions are all disabled and there’s nothing really interesting to do on the nodes. I think they are mostly used to host digital chat sessions for emergency response coordination. The Pi should be pretty good for this sort of thing because it’s inexpensive and low power. Following these instructions, and using a TNC-PI with a Baeofeng, you could setup your own packet node for around $100. Not bad!
That’s all fine and dandy, but if there’s no emergency happening then it’s boring! The most fun I’ve had is hopping from node to node to try and get as far away from my station as possible. I’ve also started mapping out where the nodes are and how they are all linked, but that gets boring too. I wanted to do something more fun with my node, so I setup Zork! That’s right, if you connect to my packet node, you can play Zork over the air! It’s really slow, but it does work! Here’s how I did it.
In order to play Zork on linux, you need an emulator. In this case, I used Frotz.
$ sudo apt-get install frotz
Then I downloaded Zork directly from infocom.
mkdir ~/games
mkdir ~/games/zork
cd ~/games/zork
pi@raspberrypi:~/games/zork $ curl http://www.infocom-if.org/downloads/zork1.zip > zork.zip
pi@raspberrypi:~/games/zork $ unzip zork.zip
Now I can launch zork locally.
pi@raspberrypi:~/games/zork $ frotz DATA/ZORK1.DAT
The next step was to find a way to allow node users to launch the emulator and play Zork. I first had to create a shell script to launch the application properly.
nano zork.sh
Then I added the following:
#!/bin/bash
export HOME="/home/pi"
export TERM="linux"
/usr/games/frotz /home/pi/games/zork/DATA/ZORK1.DAT
Then allow execution.
chmod u+x zork.sh
When you normally launch zork from the console, you only need to type in the last line. When it’s launched from ax25-node, you need to export those terminal variables or Frotz won’t launch. Now that the script is written, we need to create a new command on the node so users can launch Zork.
sudo nano /etc/ax25/node.conf
I scrolled down the to ExtCmd section and added this line to the bottom.
ExtCmd ZOrk 1 pi /home/pi/zork.sh NULL
This creates a new command called ZOrk. The capital ZO acts as a shortcut so you don’t have to type the entire command. It will launch the zork.sh script under the context of the pi user. The NULL portion just has to be there or the node won’t execute at all. I’m not sure why this is.
Now if I log into my node and type the ? command, I get this.
MYNODE:KE7ABC-9 Commands:
?, Bye, Connect, ECho, Escape, Finger, Help, HOst, Info, Links
Mheard, NLinks, Nodes, PIng, Ports, Routes, Status, TAlk, Telnet, TIme
Users, ZConnect, ZOrk, ZTelnet
If I enter ZORK, it launches the game!
ZORK I: The Great Underground Empire
Copyright (c) 1981, 1982, 1983 Infocom, Inc. All rights reserved.
ZORK is a registered trademark of Infocom, Inc.
Revision 88 / Serial number 840726

West of House
You are standing in an open field west of a white house, with a boarded front
door.
There is a small mailbox here.

>
Now if a ham radio operator connects to my node, they can play Zork over the radio at a blazing 1200 baud! It’s mostly useless, but I thought it was fun!
Comments
My blog used to be hosted on WordPress and included a comments section. This post generated numerous comments. Some of those had solutions to small problems that cropped up when walking through this guide, so I've pasted them below in case they're helpful to anyone else.
rick - January 8, 2017
Richard,

After much trial and error, reading man pages and your very well presented step by step procedure for implementing netrom I am unable to determine why I am receiving this message when implementing nrattach .

pi@PacketHost:~ $ sudo nrattach netrom
nrattach: SIOCGIFFLAGS: No such device
nrattach: cannot find free NET/ROM device
““`
I am using the original pi-1, (C)2011, and a TNC-pi board with the latest 2016-11-25-raspbian-jessy.img on the SD card. Connecting to a TNC set up in my station works very well with the axcall and axlisten commands. I am just unable to implement netrom. Since it seemed as though you implemented netrom so easily there must be a fundamental flaw in my configuration. If you would point me in the proper direction it would be greatly appreciated.

Rick
WZ8N
Steve M0SPN - April 9, 2017
I had this problem too. Check you have the netrom kernel module loaded (lsmod | grep netrom), if not, load it (modprobe netrom) – for some reason it doesn’t seem to auto-load when needed. Also – in addition to the daemons listed above, you may also wish to start mheardd to ensure the list of heard stations is kept updated. Also, when restarting, your node will lose its list of routes – there’s a ‘nodesave’ command that will generate a list for import after a restart.
Rick – thanks for this guide – it was just what I needed!
JeffS - January 24, 2018
You should be able to auto-load netrom by adding to the /etc/modules file.
JeffS - January 23, 2018
Rick:

An excellent article, but I am puzzled by one line. I am a newbie to Linux, so pardon my ignorance….

In ax25d.conf, you have this line:

default * * * * * * – root /usr/sbin/ax25-node ax25-node

However, in my Raspberry Pi install, there is no folder /usr/sbin/ax25-node; however, there is a file named ax25-node in the /usr/sbin folder.

So I modified that line to read:

default * * * * * * – root /usr/sbin ax25-node

Which seems to work, especially after I applied the fix that Steve M0SPN recommended.

Can you take a moment to explain the difference?

Thank you!
Rick - January 9, 2019
Jeff,

Based on the manual for ax25d, the “/usr/sbin/ax25-node” should be “the full pathname of the command to be run, with no arguments specified”. The “ax25-node” part at the end should be, “the text that should appear in a ps as the command name running (normally the same as except without the directory path information”. So I think I had it correct in my post. If you changes the CMD portion to just /usr/sbin, I’m not sure how it would still work.
JeffS - January 25, 2018
And following from my earlier post, I’ve attempted to run “telnet localhost 4444”, with these results:

Trying ::1…
Trying 127.0.0.1…
Connected to localhost.
Escape character is ‘^]’.
Connection closed by foreign host.

And the connection stops right there. I’ve been researching into the “Connection closed by foreign host”, and it appears to be caused by any number of issues. Have you experienced this?
JeffS - January 27, 2018
Good morning!

I worked around the “Connection closed by foreign host” issue. For this line in /etc/inetd.conf

ax25-node stream tcp nowait root /usr/sbin ax25-node

I changed “nowait” to “wait”.

**Paull Harriman - February 1, 2018**
Add the following line all the way at the bottom.

ax25-node stream tcp nowait root /usr/sbin/ax5-node ax25-node

This is a typo on this line in your webpage. It should say
ax25-node stream tcp nowait root /usr/sbin/ax25-node ax25-node

This fixed my telnet function, I can login now, but I still cant get my Kantronics to axcall
I tried going back to jesse and it still didnt work. So I’m totally perplexed.
Can you add your kantronics setup file?
Thanks

Thanks
-Paul