Intro After recently finishing the Offensive Security OSEE exam, I wanted to start looking at some real-world vulnerabilities in Windows. I had hoped I might find a recently patched vulnerability with an available PoC that could simply trigger the bug. If a PoC wasn't available, then maybe a blog post somewhere doing a root cause analysis so I could build my own PoC to trigger the bug, and then later attempt to weaponize it. After looking for recently patched vulnerabilities, I wasn't able to find anything that fit the bill and seemed to match my skill level. The recent interesting bugs didn't seem to have any available PoCs or analysis info online. I figured maybe I could do it myself, but this would mean I'd have to find a way to analyze Microsoft's patch to figure out what had changed and then work backwards from there to find the cause of a bug. Having never done patch diffing before, I had to go find resources online and teach myself how to do it. Here's what I've learned so far.
The Bug
For this example, I decided to research CVE-2023-29361. This privilege escalation vulnerability took advantage of a use-after-free bug in the Windows Cloud Files Mini Filter Driver. After doing some research on the Cloud Files Mini Filter Driver and mini filters in general, I discovered that the bug likely existed in the cldflt.sys module.
Acquiring the Binaries
The first step was to find a way to acquire a patched binary and a non-patched binary. A friend recently showed me a handy website called Winbindex which tracks different versions of Windows binaries and offers links to download them directly from Microsoft. In this case for cldflt.sys, I could find various versions of the module at the below url:
https://winbindex.m417z.com/?file=cldflt.sys
I first filtered the list by Windows version 10 22H2, because that was the platform I decided to test on.
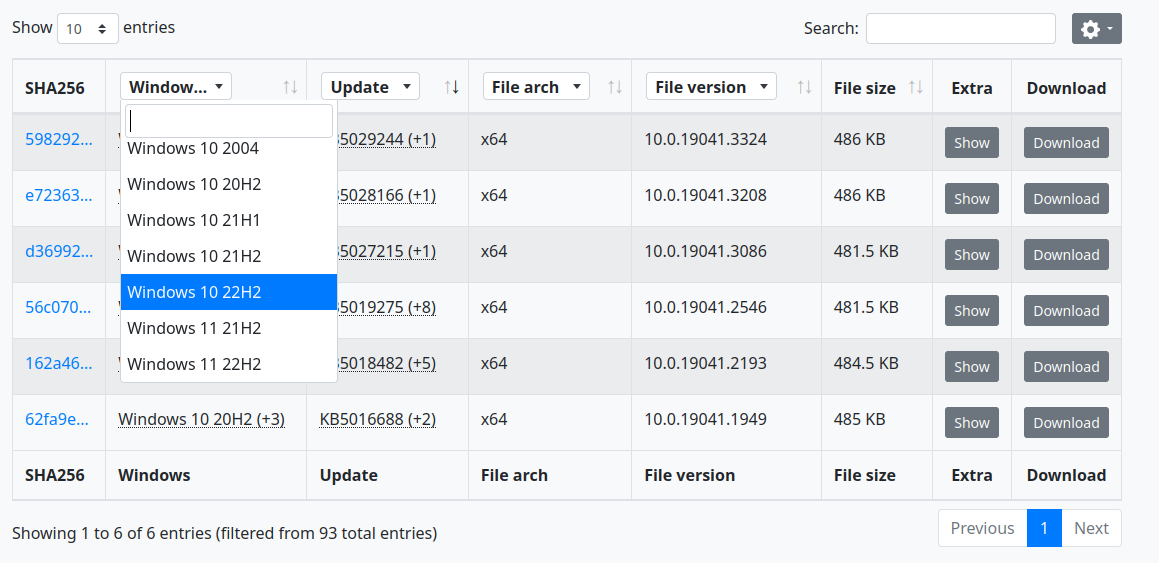
According to Microsoft, the patch for this bug was released in June, 2023. Therefore, I need the version of cldflt.sys from June 2023 and whatever the most recent version was before that. I clicked the "show" button on the right side of the table for each version. This poped up a modal with JSON data about each patch version. Eventually, I found one with the following JSON data for the 22H2 version:
"22H2": {
    "KB5027293": {
        "assemblies": {
            "amd64_microsoft-windows-cloudfiles-filter_31bf3856ad364e35_10.0.19041.3086_none_153800cf448c3c8c": {
                "assemblyIdentity": {
                    "buildType": "release",
                    "language": "neutral",
                    "name": "Microsoft-Windows-CloudFiles-Filter",
                    "processorArchitecture": "amd64",
                    "publicKeyToken": "31bf3856ad364e35",
                    "version": "10.0.19041.3086",
                    "versionScope": "nonSxS"
                },
                "attributes": [
                    {
                        "destinationPath": "$(runtime.drivers)\\",
                        "importPath": "$(build.nttree)\\",
                        "name": "cldflt.sys",
                        "sourceName": "cldflt.sys",
                        "sourcePath": ".\\"
                    }
                ]
            }
        },
        "updateInfo": {
            "heading": "June 27, 2023—KB5027293 (OS Build 19045.3155) Preview",
            "releaseDate": "2023-06-27",
            "releaseVersion": "19045.3155",
            "updateUrl": "https://support.microsoft.com/help/5027293"
        }
    }
}
The important bit was the releaseDate field:
"releaseDate": "2023-06-27"
Having been released in June 2023, this was likely the patched version. I clicked the "download" button to download that file and then renamed it to "cldflt_062023.sys". Continuing through the list, I found another version updated in May 2023. This seemed to be the most recent version before the patch. I downloaded that one too and named the file "cldflt_052023.sys".
Installing the Tools
Ghidra and BinDiff
I try to use free and/or open source tools when I can, so I wanted to stick with Ghidra and BinDiff. I hadn't used BinDiff before, but it seemed like a commonly used tool from what I found online and was likely my best option. I run Arch Linux on my PC, so I just installed both tools from the AUR.
yay -S ghidra
yay -S bindiff
BinExport Ghidra Extension
The next step was to install the BinDiff extension in Ghidra. In Ghidra's main "Active Project" window, I navigated to:
File -> Install Extensions...
Then I clicked the green plus sign in the upper right corner of the window to add a new extension. I navigated to:
/opt/bindiff/extra/ghidra/ghidra_BinExport.zip
In my case there was a slight version mismatch between Ghidra and the plugin. I just installed it anyway and it seemed to work fine.
Analyzing the Binaries
Ghidra
Next, I loaded both versions of the binary into Ghidra. I double-clicked the first one but did not auto analyze it yet. Instead, I navigated to:
File -> Load PDB File
Then I clicked "Advanced" and then "Search All". This searched Microsoft's server for known symbols. I highlighted the symbol file it found and then clicked "Load" at the bottom. With the symbols loaded, I rebased the program to 0x0. To do this, I navigated to:
Window -> Memory Map
Then I clicked the little house icon in the top right corner of the memory map window. In the pop up box, I entered "0" and clicked "OK". That rebased the program correctly. With symbols loaded and the program rebased, I navigated to:
Analysis -> Auto-Analyze
I accepted the defaults and let Ghidra analyze the binary until it was done. Finally, I navigated to:
File -> Export Program...
Then in the pop-up window I set format to "Binary BinExport (V2) for BinDiff". I set the output file name to "cldflt_052023.sys" and saved it in a separate directory for my BinDiff project. I then repeated the whole process for the other version of cldflt.sys.
BinDiff
The final step was to perform the actual diff with BinDiff. To do this, I first launched BinDiff with the UI enabled:
bindiff -ui
Then I created a new workspace using:
File -> New Workspace
Then I created a new diff with:
Diffs -> New Diff
I set the primary file to the old version of the file and the secondary file to the newer, patched version. Then I clicked "Diff". Once the diff was processed I could open it up and view the "Matched Functions". I sorted the table by similarity so that the least similar functions would show up on top. This let me know which functions had been changed between file versions. From there I could view both block diagrams side by side and start my actual analysis.

Conclusion
It took be a more time than I had hoped to find a good resource online to walk me through this process. There may be easier/faster/better ways to do this, but this is the method I've been using for now. If anyone has any tips on a better way to perform patch diffing, please drop me a line! Hopefully this is a helpful resource for someone out there and I suspect I'll be revisiting this page myself.